If you are a Facebook user who is looking for a way to make your Facebook Photo Albums private , you are on the right post. In this easy guide, you will get all the ways to make your Facebook Photo Albums private, whether you want to keep privacy level only to you or just your Friend circle. These tips work even if you are using Facebook app on Mobile – iPhone or Android.
Facebook is one of the most popular social networks with billions of users-sharing their content and photos. Facebook has also been adding options to give users more control over the privacy of their content.
How to make your Facebook Photo albums private?
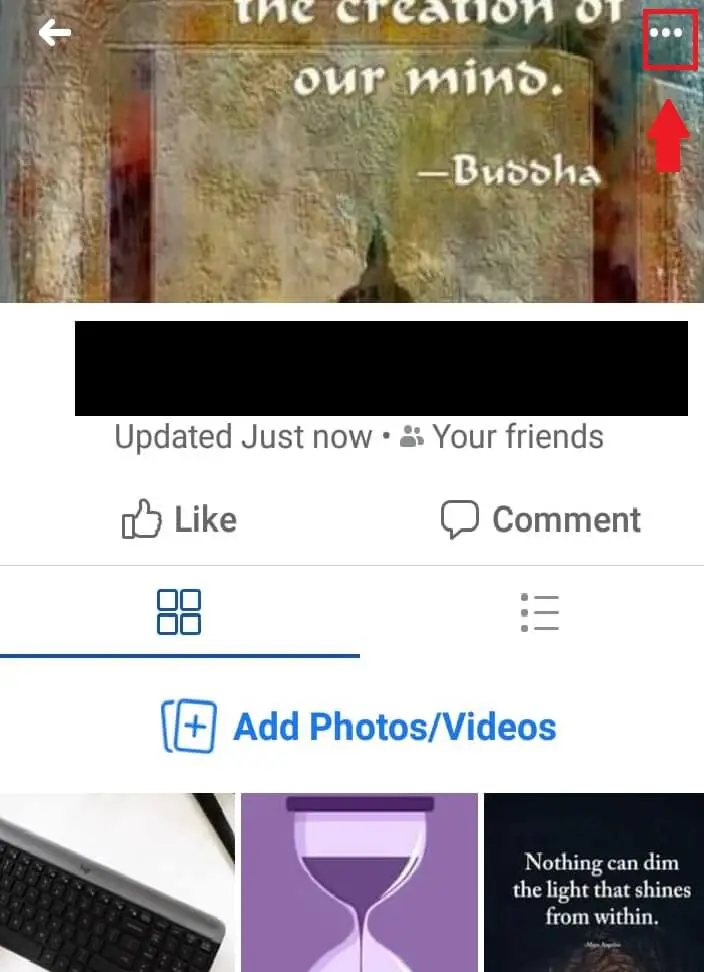
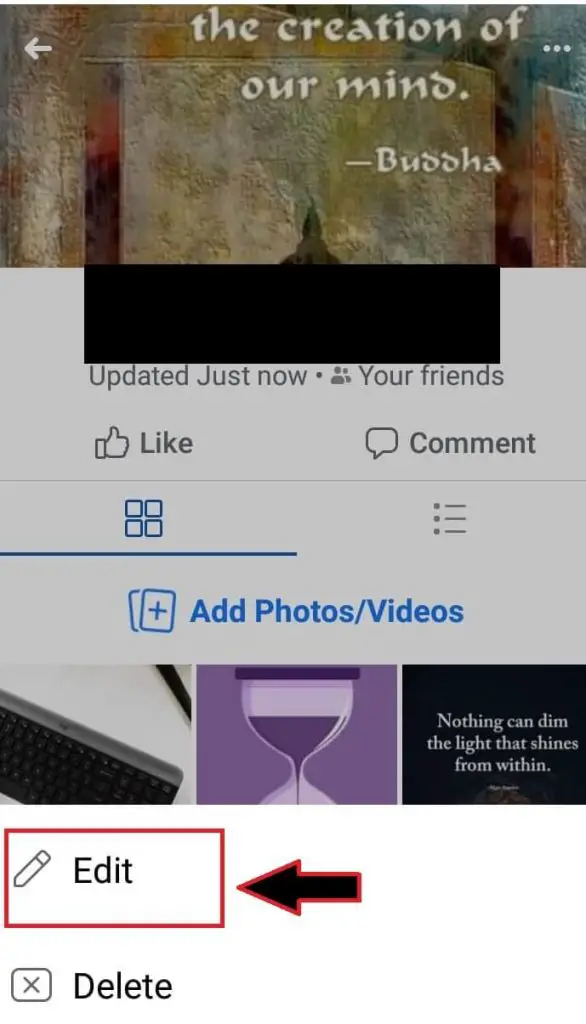
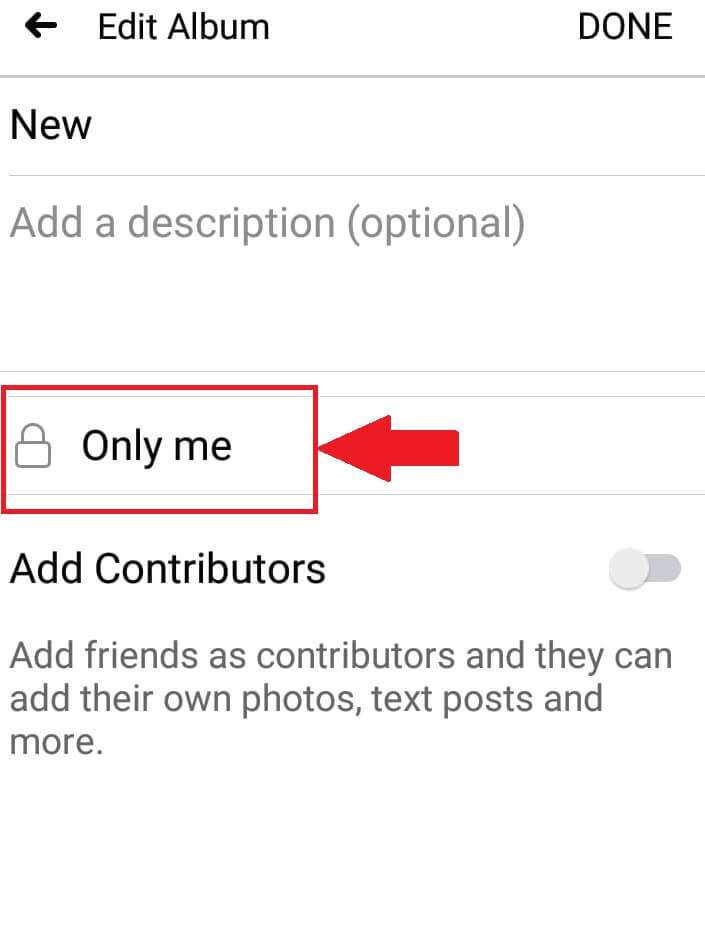
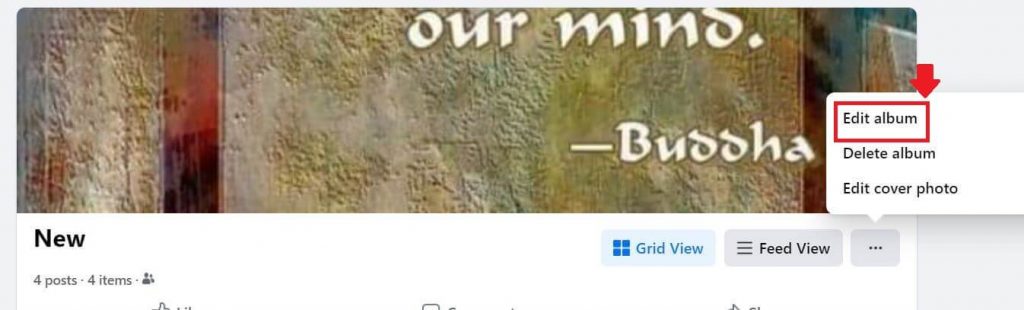
You can make your Facebook Photo Albums private by going to “Edit Album” option and changing the privacy to “Only me”. To access this option, just open the album and click on the 3 horizontal dots on the top right over cover photo of the Album.
However, there is a catch as these options may not always be visible to you.
Let’s see the reason for this in detail and the solution.
Understanding Facebook Photo Album Privacy settings
Facebook gives you a bunch of options to control the privacy for any photo album. Depending on your choice you can change the privacy of your photos on your Facebook Album.
Privacy Options in Facebook include making the albums or photos:
- Public (viewable by everyone)
- Friends (only visible to your friends)
- Friends except (can exclude a particular friend or group of friends from viewing)
- Specific Friends (share with only few friends)
- Only Me (only you can see the photo)
Let’s first understand how Facebook treats photos you upload and how it works with them.
Different types of Facebook Photo Albums and Privacy Options
This context is very important to understand to address our main question on how to make the Facebook photo albums private 2021.
Whenever you upload a photo on Facebook timeline , it actually creates a post with that photo.
Additionally, the photo gets saved in default album called “Timeline Photos” (if you uploaded the photo using Desktop) or in album “Mobile Uploads” (when you uploaded a photo using Mobile).
Similarly, when you upload a photo as your profile picture (circular shaped photo), this gets posted in timeline and photo also gets saved in another album called “Profile Pictures”.
Ditto for your cover photos which is the banner like rectangular image you see on top of your Facebook profile. Any image you use as a cover photo gets saved in the album “Cover Photos” in addition to appearing as a post on your timeline.
You can even create your own photo album with a title of your choice and upload an image directly into album.
Sad thing is Facebook does not give option to edit the privacy at album level for any of the Facebook Default Albums- namely the below albums:
- Timeline Photos
- Mobile Uploads
- Profile Pictures
- Cover Photos
For these albums, you will have to edit the privacy of individual photo in the album- and you cannot universally change the privacy of the whole album. So if you have a bunch of pictures in these albums, you do have to do a lot of work to restrict privacy for each such photo.
But when it comes to a Facebook Album created by you separately (i.e. not a default Facebook Album which we discussed above ), you can edit the privacy setting of the entire album.
For such Facebook Photo Albums created by you, you will see the direct option to “Edit Album” (click 3 dots over album cover photo) to change the privacy of all the photos in that album.
Steps to make Facebook Photo Albums Private on Facebook Mobile
- Just click on the album to open and going to 3 horizontal dots above the album cover photo (see image below).
- This brings up the option to edit the album
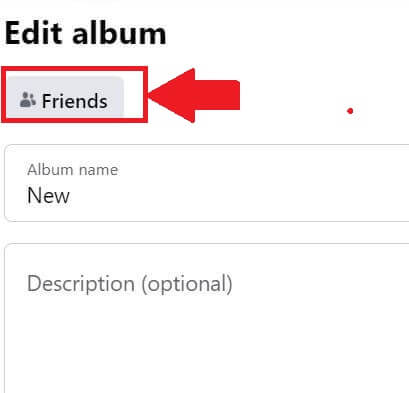
- You can now change the privacy setting to “Only Me” or “Your Friends” etc.- or any other privacy level you prefer.
Steps to make Facebook Photo album private on Facebook Desktop
- Open the album and click on the three dots which gives you the options to “Edit album” as well as other options.
- It will show you the current privacy level of the album (as below) which you can click and change as per your preference.
Important: Another thing that is worth mentioning is that if a photo is sitting in your Facebook Default album, you can always move photo to any of your created albums. However, the option to move photo between albums usually shows up only on Facebook Desktop mode.
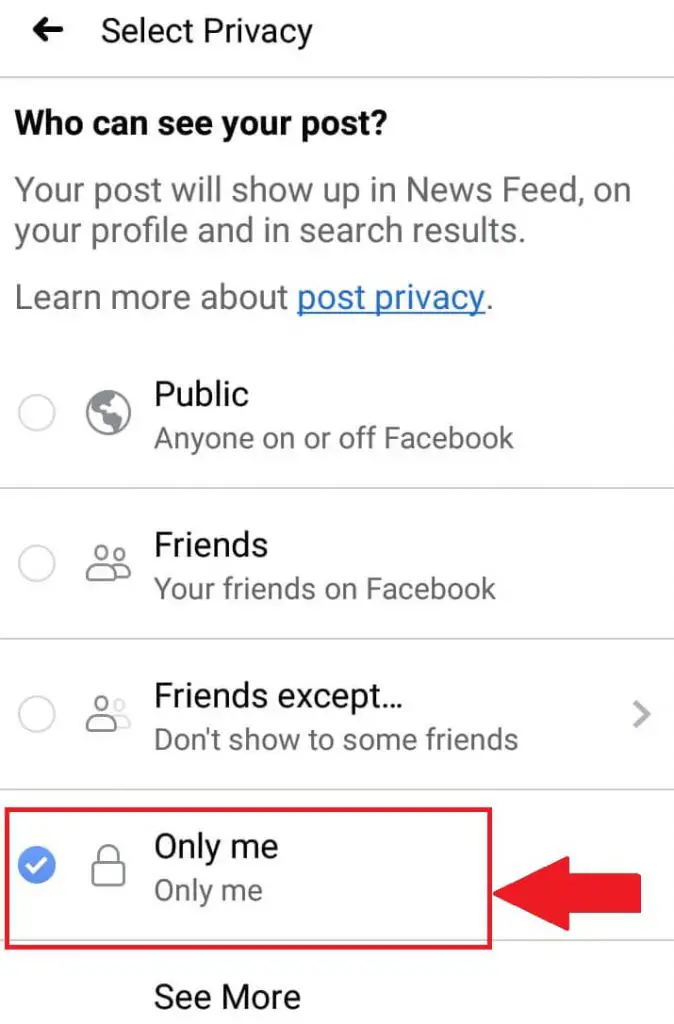
How to make a Facebook Photo Private?
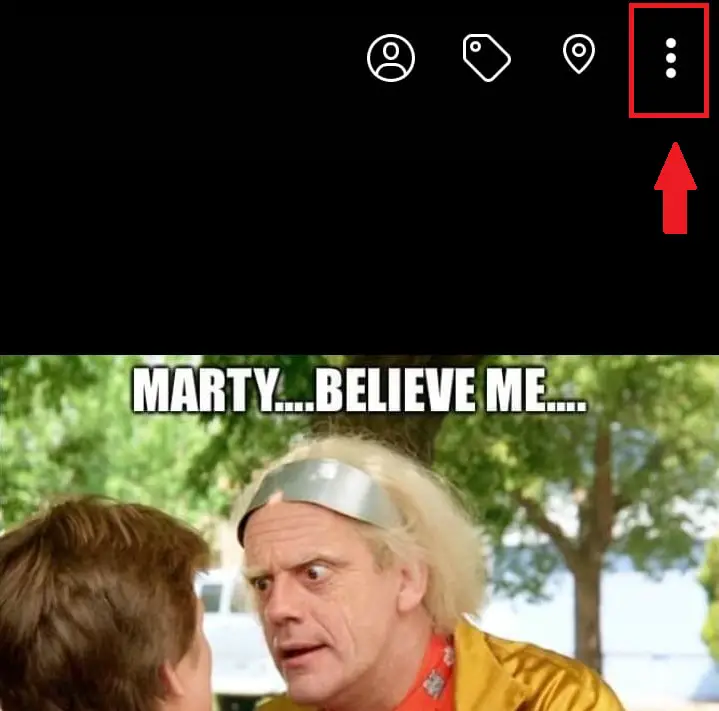
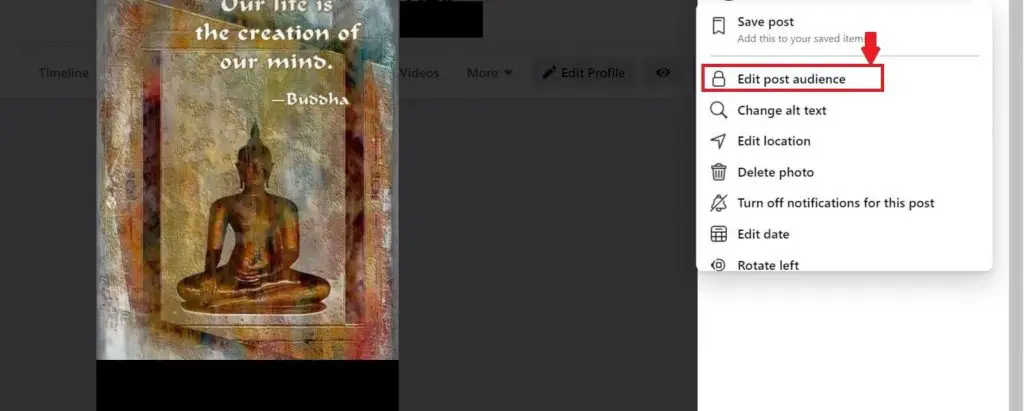
To do this, go to the individual photo or picture in the album, click on it to open in full view. Then click on the 3 dotted lines at the right hand top of the photo. You will see an option to “Edit Post Privacy” on your mobile Facebook App. Pls note this option is not available on Facebook Lite App and only on the Facebook main App.
Steps to change privacy of individual photo on Facebook App
As already explained above, you can’t change the album level privacy of Facebook Default Album and have to do it for each photo.
Go to “3 dots” on top right of image
Tap on “Edit Post Privacy” from options
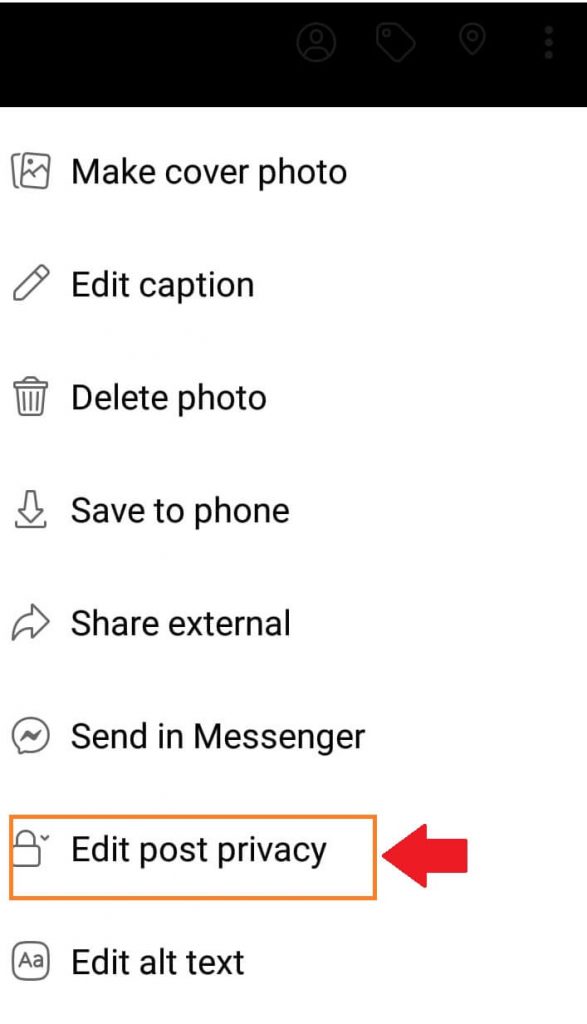
Select the privacy option of your choice
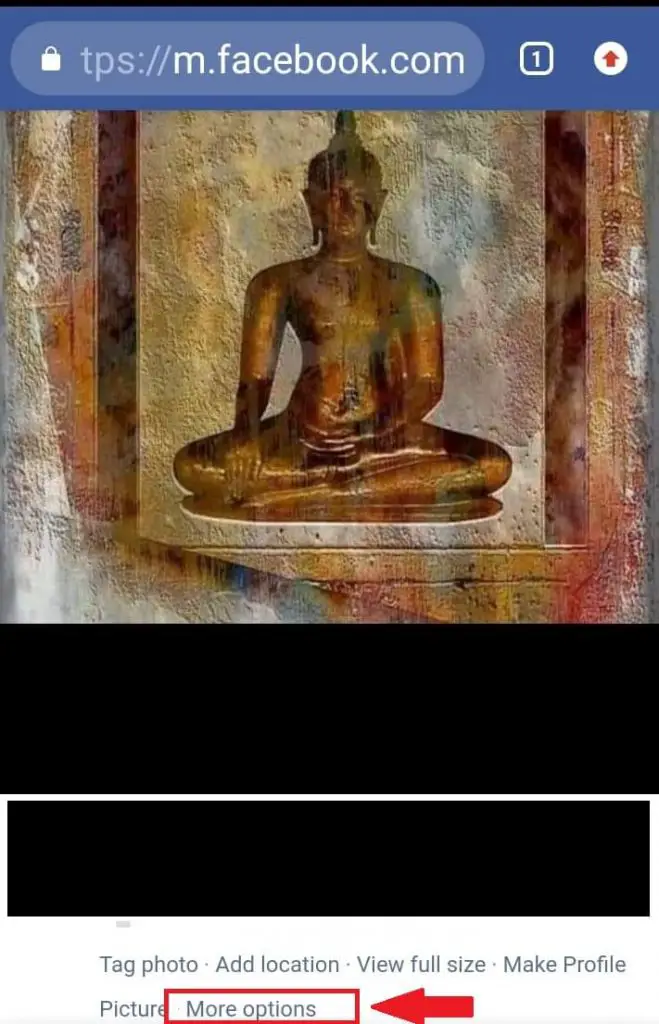
Steps to change privacy of individual photo on mobile facebook browser i.e. m.facebook option
If you are using mobile browser and going to m.facebook.com, the option is available as below.
Open the picture and you will find below options. Click on “More Options” which is one of the many options below the photo-see below
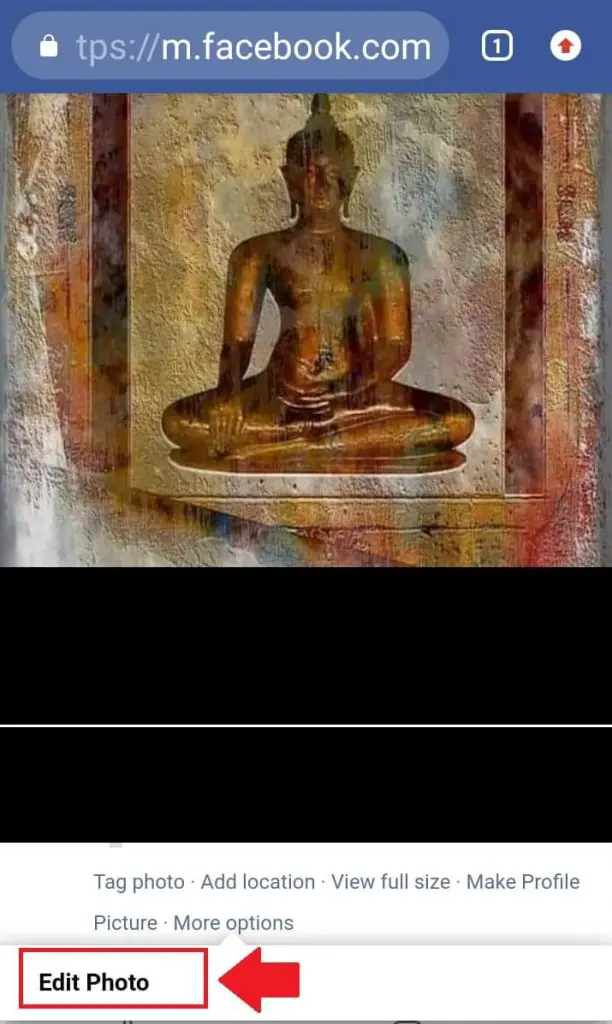
You will now see an option to “Edit Photo”, tap on it
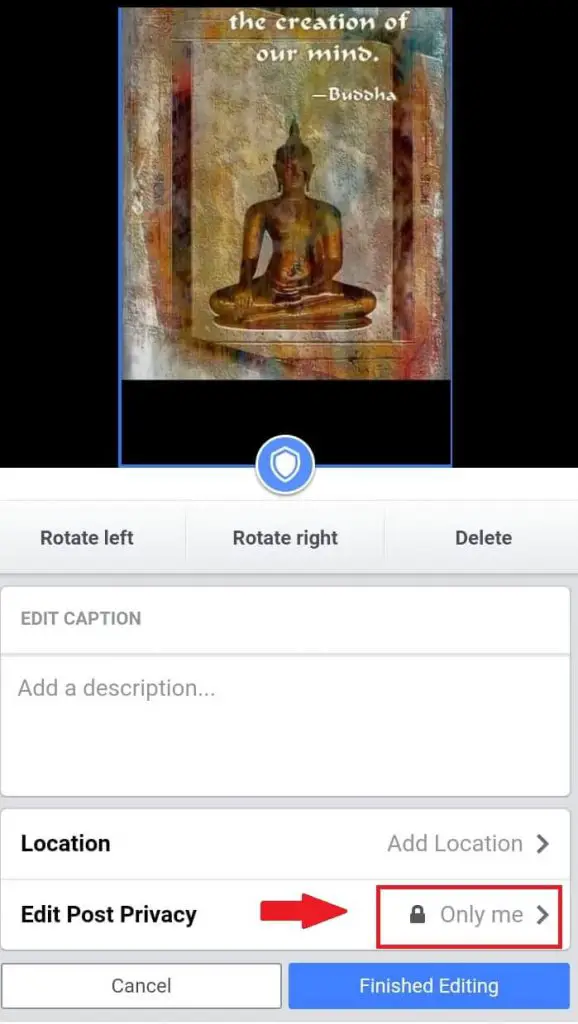
Below the image , you will now find the new options to “Edit Post Privacy”
Change photo privacy on Facebook Desktop
On desktop mode, the same option is reflected as “Edit post audience” when you click and expand the photo
Also, one more important thing to note- you cannot make your current Facebook Profile Picture or Cover Photo private. So don’t be surprised to see that there is no such option showing up to edit privacy of your current profile picture or cover photo. This is a Facebook rule that applies a default setting of “Public” to an active or current Facebook Profile Pic or Cover Photo.
If you do want to make even these pictures private, you have to either delete them or change the privacy setting of your entire Facebook profile to make it visible to only your friends.
How to confirm if the privacy settings are working or not?
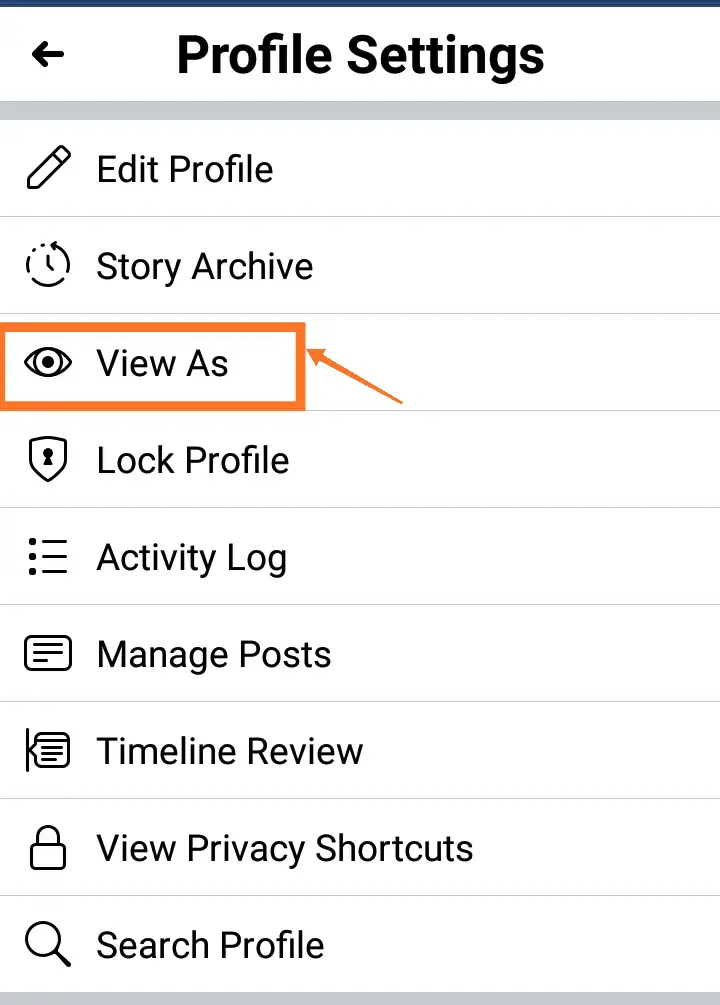
Once you have changed the privacy setting on your Facebook, you can then check the same by going to “View as” Public option. This option is available under the Profile Settings on your profile home page in Facebook App. It is also available as the eye icon on desktop mode.
Other Privacy Options
Facebook has been trying to give users more control over their privacy. While you can make your photos private, you can also control in general who can view your profile and posts etc.
However the Facebook Profile Pic and CoverPhoto are always Public. There are however some additional privacy options you can use to control some aspects of privacy like
Facebook Profile Picture Guard- This option (displayed as shield icon) when used does not give any user an option to download your Facebook Profile Pic. Further, a random user will also not get any option to share, send in message or share your profile pic externally. However, this is not a fool proof method as a user can always take screenshots and also use other workarounds. Also, check out this detailed guide on Facebook Profile Picture which goes into a lot more details on how to get the right size, all the privacy options etc.
Lock your Facebook Profile: A better way would be to restrict the privacy settings of your overall profile. You can also try “Locking your Facebook Profile”. This brings in the following controls into action:
- Only Friends will be able to view the photos and posts on your timeline
- Only Friends will be able to see full size view of cover photo and Profile Picture
- People who are not your friends will able to see a max of 5 profile details
You can also avoid using your own photo and instead chose to use your Facebook Avatar as Profile Picture- keeping it personal as well as safe.
In Facebook Privacy settings, you can also set the privacy setting for all your “Future Posts”. This way you don’t have to bother changing the privacy again and again for each post.
Hope you liked this post. Please share it with your friends to help them gain more control over the privacy of their photos on Facebook.