If you are using Facebook and curious to know how to activate follower option on Facebook, read on. This guide will help you with the complete steps on how to add the follow button and activate or turn on followers on your Facebook Profile.
Using this tips, you activate follower button on Facebook Android or iPhone. We are also covering the ways to do this on Facebook Lite App.
No. of followers on your Facebook Profile can serve as a good way of showing off how popular your profile is. This option is enabled by default on Facebook page. But if you want to activate followers on your Facebook profile, that too is easily achievable.
You should note that activating follower option on your profile replaces the “Add Friend” button with “Follow” button. Once you have activated this button, the only people who can add you as a friend- are the friends of your existing FB friend circle.
How to Activate Followers on Facebook?
There are 2 key privacy settings that you need to change to activate the follow button. First you need to change your Privacy settings on Who can add you as Friend? from “Everyone” to only “Friends of Friends”. Next you have to change “Who can Follow me” (under Public Posts) setting from “Public” to “Friends”.
Once you have done this, your profile will show only “Follow” button instead of “Add Friend” option.
Let’s see how to do this in detail with all the steps and pictures.
How to turn on followers on Facebook Main App 2021
On Facebook Main App Home Page, tap on the three horizontal lines (hamburger icon) to open up menu
Next scroll down and tap on “Settings & Privacy”
Next select the first option “Settings” from the list
On next screen, Scroll down and tap on “How people can find and contact you” section and next tap on “Who can send you friend requests”
Change the selection from “Everyone” to “Friends of Friends”
Now go back to Home Page and tap on three horizontal lines to open menu
Next select “Settings” from list of options under “Settings & Privacy”
Next scroll down and tap on “Followers and Public Content” under “Audience and Visibility“
Next change from “Friends” to “Public” under “Who can Follow Me”
How to turn on followers on Facebook Lite App 2021
On Facebook Lite App Home Page, click on the three horizontal lines (hamburger like icon) to open up menu
Next scroll down and select “Privacy Shortcuts” from the list of options
Next tap on “See More Privacy Settings”
Next tap on “Who can send you friend requests?” which is shown under “How people can find and contact you”
Next change the option from “Everyone to “Friends of Friends”
Now go back to Home Page
Tap on three horizontal lines to open menu
Next select “Settings” from list of options
Next scroll down and click on “Public Posts” under Privacy
Next change from “Friends” to “Public” under “Who can Follow Me”
How to activate followers on Facebook Desktop
On Facebook Desktop Home Page, click on the down arrow icon to open up menu
Next select “Settings & Privacy” from the list of options
Next click on “Settings”
Next click on “Privacy” section on left (see image below)
Next click on “Who can send you friend requests?” option which is shown under “How people can find and contact you”. Change the selection from “Everyone” t o “Friends of Friends”
Now move to the “Public Posts” section on the left under “Settings” itself
Next change from “Friends” to “Public” under “Who can Follow Me”
How to Check if the “Follow Button” is now added to Facebook Profile
To check if your Facebook profile is indeed showing the “Add Followers” button, simply go to “View As” option. For this, go to the Facebook Main App Home Page and then click on Facebook Profile Picture to open your profile. Next click on the 3 horizontal dots next to “Add to Story” Button and select “View As” option (eye icon).
You will now be able to see the “Follow” will be displayed under your Facebook Profile Picture on the profile. Same option to “View As” can also be accessed on Facebook Desktop mode on your profile page. Just look for the eye icon.
Wrap Up
While it is actually easy to add follower button, it does takes a number of of steps to put in place the Privacy settings to enable followers. Using the above steps, you can add the follower button whether you are using the Facebook Main App or Lite App or even Desktop mode.
Looking to find that interesting old story on Facebook? You are on the right post to get the easy steps to view old stories on Facebook (even after 24 hours). We will cover all the ways to view the Facebook stories you have created, whether you are doing this on Facebook Mobile or Desktop.
And these tips work, whether you are using Facebook on Android mobile or iPhone.
Facebook can be a bit of a maze and finding things is never as easy as it seems. However, if you know the path, it becomes a much quicker process. Again, this also gets complicated with Facebook making changes to its interface and sometimes you need to rediscover the ways.
It’s especially difficult to find an old story on Facebook, which is designed to be a temporary form of content. Facebook story is a user generated, bite-sized content – usually involving photos, videos or posts.
As per Facebook default settings, any Facebook story you create and share, is visible only for 24 hours.
But if you have a feature called “Archive” turned on (which is actually a default setting), all your Facebook stories will continue to be available to you, even after this time limit.
How to view old stories on Facebook? From Facebook Home Screen, go to your Profile by tapping on your Profile Picture-> On your profile page, tap on 3 dots (below the image) to open the menu -> Next select “Archives” from the list -> Next tap on “Story Archives”.
By default, the story archive option is turned on in Facebook Settings. But if for some reason, your archive option is in off mode, you always turn it back on.
But what if you are looking to view old story that is not created by you but coming from a Friend or Group. Well that’s going to be a lot more tougher, but we have covered some of the ways here.
Let’s look at this in detail – Step by Step with all the screenshots.
How to View Old Stories on Facebook App Mobile [Steps]
On the Facebook App Home Page, open your profile by tapping on profile pic
Click on the 3 horizontal dots below profile pic to open up Profile Settings
Select “Archive” (Box icon) from the list of options
Scroll right and tap on Story Archives tab.
You will be shown all the old stories you have created in sequential order from newest to oldest.
Using the same steps, you can access the “Story Archives” section even on the Facebook Lite App.
How to View Old Stories on Facebook Desktop [Steps]
From Facebook Home Page, go to your main profile page by clicking on your profile pic
On the Profile Page, Click on the “More” dropdown
Next click on “Story Archive” the first option in the list
You will be shown all the stories in sequential order in the Story Archives section
How to Check if Facebook Story Archives is Turned on
If for some reason, your Facebook Story Archive does not appear, you can follow the same steps as above to get to the Story Archive Section and then click on the Settings (gear icon) next to it.
This brings up the “Save to Archive” toggle option. You can turn it on or off as per your liking. But it is preferable to keep it on if you want to revisit those old posts which will always be available in your Story Archive. On the other hand, if this turned off, all your stories will disappear for you in 24 hours and don’t get saved anywhere.
But it’s always best to keep it on if you want to re-visit those old stories. Also, since the Facebook Story Archives is always private to you, there is nothing much to worry.
How to view old stories of Friends on Facebook
If you are looking to view an old story shared by Friend or Group, the process is much more difficult. Even if your friend has the FB Story Archives turned on, it will be only visible to only him or her.
However, in case your friends has saved that story to their Highlights, then you can still do this. Every time you or your friend create and share a story, Facebook also gives you an option to highlight the story (for this, your Story Archive should be turned on). It’s the star icon visible at the right bottom of the story.
If your Friend has highlighted the old story, it will appear on your friend’s profile below the Friends section and above create post option as Story Highlights.
Also, for this to work, your friend should have the Privacy Setting for the Story Highlights set to either public or friends. The option to edit the privacy setting for story highlights is available right at bottom of the highlights section under “Edit Story Highlights”
If it is not saved it will disappear from their profile after 24 hours from being shared.
Wrap Up
So make sure you have the “Story Archive” option turned on, so that you can always revisit or re-watch those old Stories you created. And if you want to watch a Friend’s old story, the only way possible is if the Friend has saved it on Highlights and allowed access to all Friends. Or you can ask him or her to re-share from his “Story Archive”, if it is turned on at their end.
Looking to find liked posts on Facebook? You are on the right post to get the easy way to do this. We will share all the ways to find liked posts on Facebook Main App, Lite App (iPhone or Android) or using the Facebook desktop mode.
Facebook has insane amount of content being uploaded on daily basis. It can be a real struggle to find that interesting video, photo or other post that you liked. Your best bet to find content is probably to like that post which makes it more easily accessible.
But even finding liked posts can be difficult if you don’t know where to look. So let’s see this in detail.
How to find Liked Posts on Facebook? The way to find liked posts is by going to the Activity Log and filtering on the “Likes and reaction” option which will give you a list of all the posts you have liked.
Let’s see this in detail with the steps involved and screenshots.
How to Find Liked Posts on Facebook Main App
On the Facebook App Home Page, go to your profile by tapping on profile pic
Click on the 3 horizontal dots below profile pic to open up settings
Scroll down and select “Activity Log” (bullet list icon) from the list of options
Next tap on “Filters” tab
Next tap on “Categories”
Next tap on “Interactions” from the list of options. This gives you access to the likes, reactions and comments etc.
Next tap on Likes “Posts and Comments” option to filter only the posts
This will show you complete history of all the posts that you have liked including videos, photos, messages, pages etc. You can also remove the likes for any of the posts by clicking the three dots next to it-which opens up a menu giving you the option to Unlike.
The way to do the same thing on Facebook Lite App is also covered below. It is exactly similar process.
How to Find Liked Posts on Facebook Lite App
Here are the steps to find liked posts on Facebook Lite App
On the Facebook App Home Page, go to your profile
Click on the 3 horizontal dots next to profile pic to open up settings
Scroll down and select “Activity Log” from the list of options
Tap on “Filters”
Next tap on “Categories”
On next screen, select “Interactions” from the list of options
Next tap on “Posts and Comments” option to filter likes
That’s it – you will be displayed the complete list of posts that you have liked.
How to Find Liked Posts on Facebook Desktop
The way to find liked posts works the same even if you are doing it on Facebook desktop. There is some slight variation in the steps involved here.
To find liked posts on Facebook Desktop mode, following are the steps:
On Home Page, click on the inverted triangle icon to open the menu
Select “Settings & Privacy” from the list of options
Next click on “Activity Log”
Next click on “Filter” link which is displayed next to it
Next select “Likes and Reactions” from the list of options
Click on “Save Changes”
It will show the date wise list of videos, photos, pages etc. that you have liked in the sequence from newest to oldest.
Wrap Up
So these are all the easy ways you can find the liked posts including videos, photos etc. on Facebook. Again once you find liked posts, you can even unlike them by clicking the three dots next to post.
This is a much better than trying to manually find in the maze of posts or using the Facebook Search bar. Make use of the activity log that saves the record of all your like and other actions on Facebook.
Looking to poke someone on Facebook but can’t find the poke button anymore. In this post, we will explain all the easy ways on how to poke on Facebook App 2022 including the Facebook Lite App and on desktop mode.
These tips work whether you are using Facebook on Android or iPhone
Facebook had introduced the Poke feature way back in 2004, when it got launched. And the Poke button got popular fast.
But it also created a lot of controversies over the years. There was no clear meaning of the intention behind a poke. To some friends, it was an innocent or a funny gesture but some saw it as an interference and took offense to it.
Facebook slowly phased out the Poke Button. But did Facebook remove this very option?
Answer is No.
What Facebook did was make it extra difficult to access this Poke button. You have to take a longer route. It is like finding something hidden in your basement.
So how to poke someone on Facebook? To Poke someone on Facebook, you need to access the Pokes page, by running a search with “Poke” from Facebook Home Screen or navigating to pokes page, by going through the Settings or Help Center.
Let’s look at this in detail with all the steps to poke someone on Facebook.
How to poke someone on Facebook [Main App]
Way 1: Use the search option in Facebook to poke
Tap on search icon on Facebook Main App Home Screen
Next type “Poke” in the search bar and run a search. Tap on the fist Pokes option (displayed under Facebook Shortcuts) to go to the Pokes Page
Search by name of friend you want to Poke. You will see the Poke option displayed next to their name
(Note this option does not work on FB Lite App, for which follow the steps after Way 2)
Way 2: Go to Pokes Page from “Help & Support” option
Tap on 3 horizontal lines on top right to open Facebook menu
Then Select Help & Support from list of options under See More
Next click on Help Center
You will get a search bar to ask question. Just type “poke” and enter to find relevant question “How do i poke someone on Facebook?”
In the answer, you will find a link to Facebook pokes page
Once you click through the link on next page, you can search for any of the friends and you will find the poke button displayed next to their name
Now do you want to know an ultra fast way to access the pokes page.
If you are logged in to Facebook on browser, just go to facebook.com/pokes
As simple as that.
Alternatively, you can follow the same long process of going through the Help Center as used in Facebook Main app.
Meaning of Facebook Poke
Facebook has never really given what is the meaning of the poke gesture. It rather allowed users to make their own interpretation. Some may use it to :
just say “Hi” or “Hello”
as a way to get your friend’s attention
nudge someone like in instant messaging
a way to show your friend that you’re thinking about him/her.
Just for fun or casual
However, some people may also take it as a flirt gesture. So you would want to be careful with whom you are poking. Don’t poke your nose where it may be taken wrongly.
Once you’ve poked someone on facebook:
your friend will get a notification,
your friend also gets an option to “Poke you back”
One you poke your friend, you cant poke them back again unless your friend pokes you back or removes your poke first.
Also, once you remove a poke from your pokes page, you can’t get it back.
Wrap Up
So you still have the Facebook Poke button which is hidden but not removed. It’s not clear why it’s kept this way. There are speculations that Facebook will change this “Poke” gesture into something else with more meaning and make it more popular again.
Until then, it continues to be a legacy feature and a walk down the memory lane to some old Facebook users. And as we have seen, the option is still available on all Facebook versions be it the Facebook Main App, Lite App or Facebook desktop mode.
If you are a Facebook user who is looking for a way to make your Facebook Photo Albums private , you are on the right post. In this easy guide, you will get all the ways to make your Facebook Photo Albums private, whether you want to keep privacy level only to you or just your Friend circle. These tips work even if you are using Facebook app on Mobile – iPhone or Android.
Facebook is one of the most popular social networks with billions of users-sharing their content and photos. Facebook has also been adding options to give users more control over the privacy of their content.
How to make your Facebook Photo albums private?
You can make your Facebook Photo Albums private by going to “Edit Album” option and changing the privacy to “Only me”. To access this option, just open the album and click on the 3 horizontal dots on the top right over cover photo of the Album.
However, there is a catch as these options may not always be visible to you.
Let’s see the reason for this in detail and the solution.
Understanding Facebook Photo Album Privacy settings
Facebook gives you a bunch of options to control the privacy for any photo album. Depending on your choice you can change the privacy of your photos on your Facebook Album.
Privacy Options in Facebook include making the albums or photos:
Public (viewable by everyone)
Friends (only visible to your friends)
Friends except (can exclude a particular friend or group of friends from viewing)
Specific Friends (share with only few friends)
Only Me (only you can see the photo)
Let’s first understand how Facebook treats photos you upload and how it works with them.
Different types of Facebook Photo Albums and Privacy Options
This context is very important to understand to address our main question on how to make the Facebook photo albums private 2021.
Whenever you upload a photo on Facebook timeline , it actually creates a post with that photo.
Additionally, the photo gets saved in default album called “Timeline Photos” (if you uploaded the photo using Desktop) or in album “Mobile Uploads” (when you uploaded a photo using Mobile).
Similarly, when you upload a photo as your profile picture (circular shaped photo), this gets posted in timeline and photo also gets saved in another album called “Profile Pictures”.
Ditto for your cover photos which is the banner like rectangular image you see on top of your Facebook profile. Any image you use as a cover photo gets saved in the album “Cover Photos” in addition to appearing as a post on your timeline.
You can even create your own photo album with a title of your choice and upload an image directly into album.
Sad thing is Facebook does not give option to edit the privacy at album levelfor any of the Facebook Default Albums- namely the below albums:
Timeline Photos
Mobile Uploads
Profile Pictures
Cover Photos
For these albums, you will have to edit the privacy of individual photo in the album- and you cannot universally change the privacy of the whole album. So if you have a bunch of pictures in these albums, you do have to do a lot of work to restrict privacy for each such photo.
But when it comes to a Facebook Album created by you separately (i.e. not a default Facebook Album which we discussed above ), you can edit the privacy setting of the entire album.
For such Facebook Photo Albums created by you, you will see the direct option to “Edit Album”(click 3 dots over album cover photo) to change the privacy of all the photos in that album.
Steps to make Facebook Photo Albums Private on Facebook Mobile
Just click on the album to open and going to 3 horizontal dots above the album cover photo (see image below).
This brings up the option to edit the album
You can now change the privacy setting to “Only Me” or “Your Friends” etc.- or any other privacy level you prefer.
Steps to make Facebook Photo album private on Facebook Desktop
Open the album and click on the three dots which gives you the options to “Edit album” as well as other options.
It will show you the current privacy level of the album (as below) which you can click and change as per your preference.
Important: Another thing that is worth mentioning is that if a photo is sitting in your Facebook Default album, you can always move photo to any of your created albums. However, the option to move photo between albums usually shows up only on Facebook Desktop mode.
How to make a Facebook Photo Private?
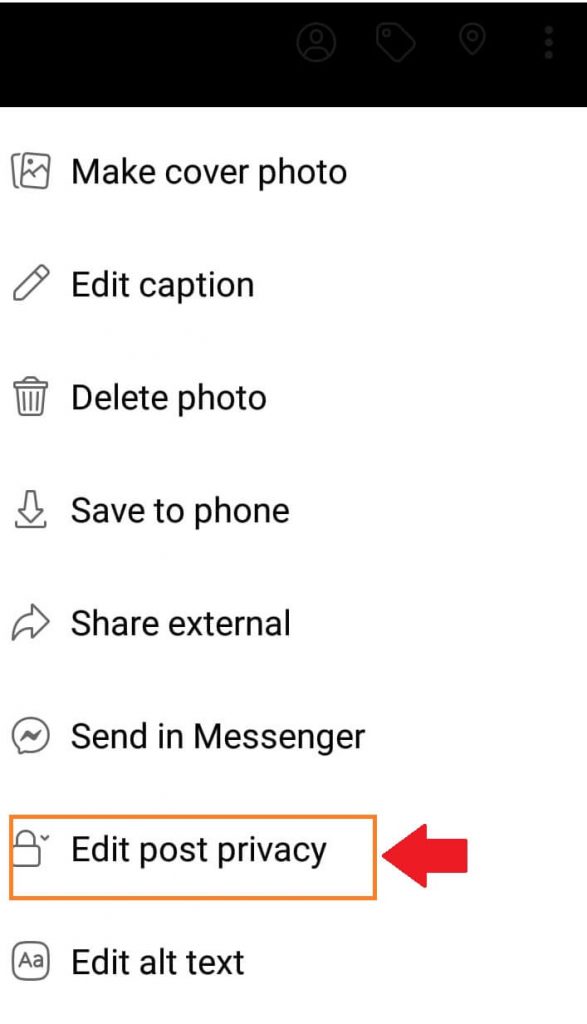
To do this, go to the individual photo or picture in the album, click on it to open in full view. Then click on the 3 dotted lines at the right hand top of the photo. You will see an option to “Edit Post Privacy” on your mobile Facebook App. Pls note this option is not available on Facebook Lite App and only on the Facebook main App.
Steps to change privacy of individual photo on Facebook App
As already explained above, you can’t change the album level privacy of Facebook Default Album and have to do it for each photo.
Go to “3 dots” on top right of image
Tap on “Edit Post Privacy” from options
Select the privacy option of your choice
Steps to change privacy of individual photo on mobile facebook browser i.e. m.facebook option
If you are using mobile browser and going to m.facebook.com, the option is available as below.
Open the picture and you will find below options. Click on “More Options” which is one of the many options below the photo-see below
You will now see an option to “Edit Photo”, tap on it
Below the image , you will now find the new options to “Edit Post Privacy”
Change photo privacy on Facebook Desktop
On desktop mode, the same option is reflected as “Edit post audience” when you click and expand the photo
Also, one more important thing to note- you cannot make your current Facebook Profile Picture or Cover Photo private. So don’t be surprised to see that there is no such option showing up to edit privacy of your current profile picture or cover photo. This is a Facebook rule that applies a default setting of “Public” to an active or current Facebook Profile Pic or Cover Photo.
If you do want to make even these pictures private, you have to either delete them or change the privacy setting of your entire Facebook profile to make it visible to only your friends.
How to confirm if the privacy settings are working or not?
Once you have changed the privacy setting on your Facebook, you can then check the same by going to “View as” Public option. This option is available under the Profile Settings on your profile home page in Facebook App. It is also available as the eye icon on desktop mode.
Other Privacy Options
Facebook has been trying to give users more control over their privacy. While you can make your photos private, you can also control in general who can view your profile and posts etc.
However the Facebook Profile Pic and CoverPhoto are always Public. There are however some additional privacy options you can use to control some aspects of privacy like
Facebook Profile Picture Guard- This option (displayed as shield icon) when used does not give any user an option to download your Facebook Profile Pic. Further, a random user will also not get any option to share, send in message or share your profile pic externally. However, this is not a fool proof method as a user can always take screenshots and also use other workarounds. Also, check out this detailed guide on Facebook Profile Picture which goes into a lot more details on how to get the right size, all the privacy options etc.
Lock your Facebook Profile: A better way would be to restrict the privacy settings of your overall profile. You can also try “Locking your Facebook Profile”. This brings in the following controls into action:
Only Friends will be able to view the photos and posts on your timeline
Only Friends will be able to see full size view of cover photo and Profile Picture
People who are not your friends will able to see a max of 5 profile details
You can also avoid using your own photo and instead chose to use your Facebook Avatar as Profile Picture- keeping it personal as well as safe.
In Facebook Privacy settings, you can also set the privacy setting for all your “Future Posts”. This way you don’t have to bother changing the privacy again and again for each post.
Hope you liked this post. Please share it with your friends to help them gain more control over the privacy of their photos on Facebook.
Facebook cool new feature called Avatars which gives you the ability to create your own personalized avatar. Facebook Avatar is nothing but an animated cartoon image of yourself. Think of them as your animated twin. In this guide, we are going to cover all the details on how you can make your own Facebook Avatar using Facebook App on Android or iPhone.
You can even use the Facebook avatar in your profile picture or send it as a sticker to your comments. It adds a personal digital feel to your messages and profile.
At the same time, you don’t need to worry about the privacy part. Most people would be more comfortable sharing an avatar image than your actual image.
In fact, once you create your avatar, Facebook automatically creates a collection of stickers using your avatar which you can use for a variety of occasions. You can use these stickers to send personalized messages to your family and friends.
Case for Facebook Avatar?
Show Your Style: Tailor your avatar to be uniquely YOU.
Stay Privacy-Savvy: Share a fun animated version instead of a real photo.
Say It with Stickers: Facebook generates custom stickers with your avatar for endless fun.
Cross-App Fun: Use avatars across Facebook, Instagram Stories, and Messenger.
Facebook i.e. Meta recently rolled out 3D Avatars and has also added new customization options for the Facebook Avatar like Cochlear implants and over-the-ear hearing aids (for one or both ears). You can also get to use your Avatars in Instagram stories, probably a step towards the MetaVerse that Facebook intends to build. You can also get the Avatar option on Instagram if you click on Settings->Account->Avatars, which has been rolled out in countries like the USA, Canada, and Mexico.
Facebook Avatar Not Working?
Before you start making Facebook Avatar, make sure you have the latest version of the Facebook App on your mobile. Many times, the option of creating an avatar is not available or not working if you are using an older version of the app. Also, make sure you are NOT using the Facebook Lite App as it does not show this option. It is also not showing on the Facebook website (Desktop). Not even on m.facebook.com. It is available only on FB’s main app.
Few things to double check if you are still not able to get the Facebook Avatar option:.
Make sure you are using the latest version of the app. Check-in Playstore or Appstore to confirm if your Facebook App is updated
If you still don’t find the avatar option, go to the “Manage Apps” option in your mobile settings and “Clear Cache” on Facebook App
If you have made an update to Facebook, try logging out and re-login to see if the Facebook avatar options show up
Try allowing “Location access” under Facebook Settings-> Settings & Privacy” -> Settings->Location and see if this works
Still not there – It’s not you, it’s probably FB: Despite Facebook’s ongoing efforts to enhance the Avatar feature, many users continue to face challenges in accessing or creating their FB avatars.
Feature Unavailability: Users still report that the Avatar option is missing from their Facebook app menus. Even after updating the app, reinstalling, or accessing Facebook from different devices, the option remains elusive. Some say got it only by creating a new profile altogether
Error Messages: Some users encounter error messages when attempting to create an avatar. For instance, clicking on a friend’s avatar to create their own leads to errors or non-responsive interfaces.
Regional Restrictions: There are instances where users receive notifications stating that the Avatar feature isn’t available in their region, even when others in the same area can access it.
Seems like Facebook has made this a game of luck unfortunately.
How to Make Facebook Avatar
Here is a rundown of how you can go about creating an avatar:
Step 1: Go to Facebook App-Home Screen and tap on three horizontal lines to open the menu
Step 2: If you see the Avatars icon, tap on it and move to Step 4. In case it is not visible, scroll down and tap on the option “See More”. Step 3: Next tap on Avatars under “See More“
Step 4: Follow the avatar-making guide to customizing the Avatar’s Face
Alternatively 1. Go to Facebook Comments 2. When you make a comment, tap on the smiley icon and select “Stickers” 3. Under Stickers, you will find an option “Avatar”
Unfortunately, you can’t use your existing image or photo to make your Facebook Avatar. But you have to make one from scrap. The only thing FB detects is your Gender from your Facebook Profile to give you the appropriate avatar customization options
But don’t worry. The process is actually quite simple, as Facebook allows you to customize almost all the features of your face and body type.
Another thing is while creating your avatar, one useful feature available is also a mirror icon. When tapped, it gives you the option to put on your front camera and check if the avatar is actually working for your features. That way you are not way off the mark.
You can even add gear like hats, specs, and ornaments and select from a range of outfits to make your avatar look great. Guys can sport a beard. Girls can add make-up and ornaments like nose rings, earrings, etc.
Let’s see all the various kinds of customization you can do while making an avatar.
Starting from your skin tone, you can change your hairstyle, face shape, complexion, eye shape, eye color, eyebrows, nose, and mouth, and add facial hair. You can even add details like lines, moles, wrinkles, and freckles to the face using the complexion and lines tab.
And then, there is all the gear and outfits.
But the idea is not to overdo it. Try to keep your avatar an authentic version of yourself that makes you look good.
You can use different versions of your avatar to convey different types of emotions
Once you have your Facebook Avatar ready, FB will now give you a ready-made collection of stickers with your avatar. The stickers show your avatar in all kinds of different expressions and can use on a variety of occasions.
You can use Facebook Avatar Stickers in
Comments
Messenger
Facebook Story
News Feed
And even share it on Whatsapp (a Facebook app)
What’s more, you can even use your Avatar as a Facebook Profile Picture (you get a separate set of Avatar pics for this). Scroll down below to know more about how to use FB Avatar as a Facebook Profile picture.
Stickers available for some common messages
Hi
Bye
Happy Birthday
Thank You
Good Morning
Good Night
OMG
Good Luck
Yes!
Cool
Use Facebook Avatar Stickers in your Comments
You can insert these stickers in your comments or messages by following the below steps
When writing a comment, tap on the smiley button
Below you will find an avatar icon.
Tap on it to open up the collection of stickers. Select the one you want to use by tapping on it.
How to Share Facebook Avatar Stickers on Whatsapp
What’s more, you can even use your Avatar stickers on FB Messenger, News Feed, Facebook Story, and even on your Whatsapp chat.
Just follow the steps below to share Facebook Avatar Stickers on Whatsapp:
Go to settings and then go to “Avatars”
You will be taken to Avatar’s main image page, which gives you 3 icons. The first is Share, 2nd is Stickers and 3rd icon is used to edit your Avatar.
The first option which is Share Icon (arrow icon) gives you options to send “avatar image to Feed” or “Set it as a Profile Picture“. You need to select the second option, which is Stickers which takes you to the collection of stickers with your Avatar. And you get two more options – to send a selected sticker in Messenger or click on “More Options”. Tap on the More options to get the option to share in Whatsapp
Use your Avatar in your Facebook Profile Picture
You can even use your Avatar Photo as your Facebook Profile Photo. For this, you need to go to your main avatar image (same path as above) and click on the first icon “Share” symbol which gives the option to “Set it as Facebook Profile Picture”
Alternatively, you can just right-click on the existing profile picture and you will see an option to “Make Avatar as your profile picture”. Once you tap on this option, it again takes you to the Main Avatar image and you need to click on the “Share” symbol and select the option “Set it as Facebook Profile Picture”.
This will give you a set of cool pics with your Avatar in different poses. It also gives your a collection of nice background colors to choose from.
We also have a FB avatar pose with a mask for these times 🙂
Just select the pose and background color of your choice to flash your Avatar as an FB profile pic.
Wrap Up
Facebook Avatar is a great feature if you have access to and use it well. It’s really interesting to create and use your personal digital avatar in your interactions on the platform. You can also add spice to your conversations with Facebook Avatar Stickers. Do make sure you have the latest version of Facebook to avoid issues of Facebook Avatar not working.
Hope you have found this guide useful. Do share it with your friends to help get their Facebook Avatar up and ready.
If you are a Facebook user, changing or uploading a Facebook Profile Picture of your choice seems like an easy task. However, there are many questions that may come to your mind like how to get the right Facebook profile picture size, how to upload a profile picture in full size without cropping it, or changing your profile picture without losing likes.
In this detailed guide, we are going to cover the complete tips and tricks to answer all of these questions.
This post will give you a ton of information to simplify your life on Facebook – as far as your profile picture is concerned.
The answer to some of the questions needs a bit of a workaround. That’s just the way Facebook is at the moment, requiring some complicated steps even for simple tasks.
Also, the fact that Facebook constantly makes changes and tweaks to its interface can make things a bit more confusing. But let’s clear that.
Update: Facebook made some changes in 2022 since we originally created this post. It seems that cropping is inevitable now. However, by using Way 1 below, you should be able to reduce the impact of cropping. For best results, we recommend using a square image for the profile picture with you in the middle.
Facebook has two images that sit on your main profile-
Profile Picture – displayed in a circle shape
Cover photo – displayed as a rectangular-shaped banner image
You can enhance the look of your Facebook profile by choosing the right size and quality for these images.
First, let’s address the basic question about what size or dimensions to use for Facebook Profile Picture and why it gets cropped. Let’s answer this.
What’s the Facebook Profile Picture Size and why does it get cropped?
The Facebook Profile picture is displayed in the following dimensions:
170 by 170 pixels- For Desktop / Laptop view
128 by 128 pixels- For Smartphones
36 by 36 pixels- For other featured phones
Note, that this is the size in which the profile picture is displayed and not what is uploaded or stored on Facebook.
You can actually upload a picture of any size. But the minimum width needs to be 170 pixels.
While the dimensions make it look simple, getting the right image size can be confusing. Because when you upload the Facebook Profile picture in a normal fashion, it gets cropped and saved in a square shape automatically (you can reduce the impact or avoid cropping using the ways discussed below)
And the way the cropping is done is that it will crop the height or width (whichever is more)– to make it equal to the size of the smaller side to form a square.
To squeeze in a technical jargon here, a Facebook profile picture has an aspect ratio of 1:1 (Aspect ratio is the ratio of width to height of the image, which is always 1:1 for squares)
For e.g. if the image size is 720 (w) x 480 (h), it will crop the width to make the image a square of 480(w) x 480(h). This is assuming you don’t do zoom-in while uploading the pic.
If you choose to apply full zoom, the photo will be cropped 170 by 170 which is the default display size ignoring both dimensions of the original pic.
However, when it is displayed on your profile or in your posts, it takes the shape of a circle with a diameter equal to 170 pixels.
So ideally, you should choose a square profile picture with yourself in the middle so that the image looks good even when it’s displayed in a smaller format on the mobile.Here you can also use Canva profile picture maker or take the help of tool websites to resize your Facebook Image as per requirement.
Let’s now answer the question of how to upload a Facebook profile picture in full size (no cropping):
How to Upload Facebook Profile Picture Without Cropping
To skip cropping on mobile, go to m.facebook.com using a mobile browser, then upload the image as a post on your timeline and use the “Make Profile Picture” option below the post, which will make the image your Profile Picture without cropping.
Way 1- Go to m.facebook.com– Login and upload the image as a post on your timeline. Then use the “Make it Profile Picture” option (works best for both iPhone and Android mobile users)
Way 2- Use Facebook Classic Interface – Upload the image and use the “Skip Cropping” option (on Desktop)
Way 3- Use Facebook Lite App on Mobile – Upload the image as a post on the timeline and then use the “Make it Profile Picture” option (suitable for Android users since Facebook Lite App is currently not available in the Apple App store)
Let’s talk about these ways in detail:
Way 1 is a preferred choice for iPhone mobile users.
Let’s talk about the details and steps involved in each of these ways.
Way 1- Upload the image as a post and use the”Make it Profile Picture” option [using Mobile Browser]
This hack works great for Mobiles- Android or iPhone.
Use the following steps-Login to your m.facebook.comon your mobile (this even works on a laptop) using Google Chrome or any other browser
Step 1- Upload the image you want to use as a “Profile Picture” as an image post on your timeline. While posting, you can keep the privacy settings to “Only Me” (since this is a temporary posting which you can delete later)
Step 2- Click the image you posted on your timeline to open it in full and you will see an option to “Make it Profile Picture” BELOW the image. Tap on it
Step 3- Next it will ask if you want to Switch back to the original profile picture after some time period. Just click on ‘Never’ meaning you don’t want to switch back
Step 4- You can now see the full image is posted without any cropping as the Profile Picture.
You can delete the image post now that the profile picture is updated.
Way 2- Use Facebook Lite App which has the “Make it Profile Picture” option [for Android]
This is another method to avoid cropping similar to Way 1.
If you have the Facebook Lite app- the smaller and less data-intensive Facebook app version.
Note: This app may not be available for iPhone users and in certain countries.
Step 1-Open Facebook Lite Appand upload or post the image you want to use as a “Profile Picture” on your timeline.
While posting, you can keep the privacy settings to “Only Me” (since this is a temporary posting which you can hide later)
Step 2– Next open this image post in full view. Click on 3 vertical dots on the top right of the image
Step 3: You will see an option “Make Profile Picture”. Tap on it and confirm. You will see that the whole image becomes your Profile Picture without any cropping.
Way 3- Use Classic Facebook Interface and use the ‘Skip Cropping’ Option [Not Accessible Now]
Update: This method is no longer working as it is not possible to get the classic interface on the desktop. Please explore way 1 which works even on desktop using Facebook mobile URL.
In the good old days, the Facebook classicinterface on the desktop would give you a readymade “Skip Cropping” button when uploading the Facebook Profile Picture. Surprisingly, this useful option is taken away in the new facebook versions.
You could still switch back to the classic interface using extensions, but even this method no longer gives results
Change Facebook Profile Picture without Notifying Anyone
When you change your Facebook Profile Picture, there is an auto-post on your timeline which mentions your profile picture is updated.
You can switch the privacy setting for this particular post immediately from “Public” to “Only Me” which means only you will be able to see this post.
Steps to change Facebook Profile Picture without notifying anyone
Add the photo as a post to your timeline. While adding you have the option to change the post privacy settings to “Only me”
Click on the photo in this post and click on the option “Make Profile Picture”
Your Profile Pic will be updated with this photo and there will be an auto-post about the update. Now immediately go to this auto-post and change the privacy settings of this post to “Only me”
In fact, when you delete a picture from your Facebook Profile Pic Album, it also deletes the auto-post from your timeline.
Change your Facebook Profile Picture without Losing Likes
Got a bunch of likes and comments on your Facebook Profile Picture which you don’t want to sacrifice by changing.
Well, the thing is with Facebook, you don’t really lose the likes and comments.
The likes and comments stay along with the original picture which is stored in your Facebook Profile Picture Album.
So in case you moved to your new Pic that doesn’t get the kind of likes and comments as your old one, you can always switch back to the old profile Pic by going to the Facebook Profile Pic Album and selecting it from there (Don’t do a fresh upload of old profile pic which will cause you to lose the likes and comments)
Other Important Points on Profile Pic
Facebook Profile Picture Guard
Facebook Profile Picture Guard is a great feature to protect your privacy.
If you turn it on, Facebook does not give the option to download your Facebook Profile Pic for any other user.
A random user will also not get any option to share, send in a message, or share your profile pic externally.
It restricts anyone from tagging your profile pic unless the person is your friend.
When you turn on the Facebook Profile Picture Guard, it adds a blue border to your profile pic and also shows a shield symbol below the picture.
Looking to search for a specific post on Facebook by date. In this guide, you will get a step-by-step guide on how to search Facebook posts by date i.e. day, month, or year.
Facebook is one of the most popular social networking platforms having more than 2.6 billion active users. Recently, Facebook has done a lot of changes, giving you the option of a more modern-looking interface apart from the classic look.
Facebook has also been changing the features to find information across Facebook including the ability to search for posts by date, or posts from a particular page or group, friend, etc.
So let’s answer the main question.
How do you search for a specific post on Facebook by date? You can search for Facebook posts by date by typing in the relevant keywords in the Facebook search bar and using the filter of Posts and Date (Year) to show only the specific posts for a particular time period.
But it’s not as easy as it looks. There are some factors to consider.
Let’s look into this in more detail-Step by Step
Before we start on the steps, there are some factors that impact the search options available to you on Facebook.
The important consideration here is – Your ability to search for a Facebook post by date changes depending on how you are accessing Facebook i.e. from Desktop or Mobile. If you are using mobile, it depends on which Facebook app you are using.
The Facebook Classic Interface on Desktop and Facebook Lite App on Mobile gives you more advanced search options.
If you are using Facebook on a desktop, switch to Facebook Classic Look by clicking on Down Icon on Home Page-Right Side. (Update: The option to switch to the Classic look has been recently disabled by Facebook for most users. So this method won’t work now)
If you are using Facebook on a Desktop, you will be able to filter results only up to a specific year. While the older Facebook Classic interface gave you more specific options to filter further up to month and year.
On the other hand, if you are using mobile, the Main Facebook App again allows you only to filter dates up to a year. But if you use the Facebook Lite App (not available for Apple App Store), you can filter the post actually up to a specific day or custom time span say between 2 dates.
In Short, summary of “Search Posts By Date” drill-down options on Facebook:
Desktop
Facebook Desktop Classic Interface (no longer supported by Facebook)- Allowed to search posts up to a month and year
Facebook Desktop New Interface- Allows to search posts only up to a year
Mobile
Facebook Lite App- Allows to search posts up to a custom date range i.e. between any two dates
Facebook Main App- Allows to search posts only up to a year
So the best practice is to use Facebook Lite App if you are looking to run a very specific search i.e. up to a specific day. But if you want to filter only up to a month/year use Facebook Desktop with Classic Look Option (again the Classic Look option may not work now)
Recent update- Now in the Facebook Main App, you have been given the option to search the Posts, which you have created, by going to the 3 dots below your Facebook Profile Picture which opens up the “Profile Settings” and then goes to “Manage Posts”. This gives you the option to filter posts on a particular date, but this seems to filter only those posts created by you (details are covered in Note 2 below)
Now with that information, let’s jump to the specific steps involved.
How to Search Facebook Posts by Date
(Screenshots from Facebook Lite App– the process is the same for Facebook Desktop or Main App, but these allow you to filter only up to a year)
Step 1- Tap on the search bar, run a search by typing relevant keywords for the post in Search Bar and press enter to run a universal search across Facebook
Step 2- On the next screen, apart from search results, you get a bunch of tabs to narrow down your search results like Posts, Photographs, People, Videos, etc. Tap on the Posts tab and you will be able to see only posts in search results with a bunch of options to filter your results further.
Step 3- Now you have specific filters to narrow down the search results like Recent Posts, Posts you’ve seen, Date Posted, Posts From, Posted in Group, Tagged Location, and Date Posted. If you are using Facebook App on mobile, these options are displayed horizontally and on a laptop, it is displayed vertically.
Step 4- Select the “Date Posted” tab. Using this filter, you can filter on a particular year or select “Choose Date” to enter a custom date range e.g. between 2 dates. If you are using Facebook Lite App, it allows you even more specific options to select a particular date or custom time span between 2 dates
How to Search Facebook Posts by Date on Facebook Main App
Note 1: As mentioned earlier, you can use the same steps as mentioned in the section above i.e. Run a search using the search bar feature for keywords and then filter on “Posts”.
After Step 2, to get to the “Date Posted” option, tap on the filter symbol on Facebook Main App (See images below). However, Facebook Main App gives you options to filter only up to a Year and not on a particular date.
Note 2: Facebook Main App now also has the option to filter Posts under the “Manage Posts” Section. However, this seems to work only for the posts created by you, although it gives options to select Posted by “Anyone” or “Others”.(See screenshots below)
Using the Manage Posts option to filter your own Posts on Facebook Main App [Screenshots below]
Go to the three dots below your FB Profile Pic which opens the Profile Settings
Select “Manage Posts” from the list
Filter Date using the “Go To” Field
Search Options in Facebook Desktop Mode (Classic Look)
Let’s talk about the other filters and search options:
Posts From -This gives you the ability to search the posts from a specific person, page, or group. You can filter posts from you, from your friends, from your groups or pages, or other public Posts If you want to narrow down the result to a specific page or a group, click on “Choose a Source”
Posts Type – This is pretty straightforward. You can filter all posts or only those posts which you have seen earlier
Posted in Group- Filter results to include only results from a particular group or groups
Tagged Location- You can also filter posts by the location where the posts are tagged to a particular location.
Now, although the filter is for posts on a date, it is not specific to a month or specific date.
Wrap Up:
So you see while it is easy to run a search for finding posts by date, the important consideration is the ability to filter down depending on whether you are using the Facebook Desktop or Mobile and also the app used. Here’s the summary:
Use Facebook Lite- to search for posts by date i.e. on a specific day or between 2 dates
Use Facebook Desktop (Classic Look)- to search for posts up to month and year
Use New Facebook Desktop or Facebook Normal App- to search posts if you only want to filter up to a year
Hope you liked this article and share it with your friends who may find the information useful.